Extend Linux VM’s Drive (Proxmox, VMware and Others)

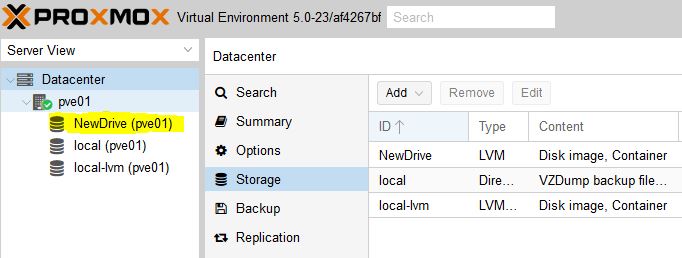
In this example we are going to add a new disk 5GB and extend root (/) partition partition.

Edit VM and add new 5GB Drive. New drive /dev/vdc has been added.

fdisk -l

Disk /dev/vdc: 5368 MB, 5368709120 bytes, 10485760 sectors
 Units = sectors of 1 * 512 = 512 bytes
 Sector size (logical/physical): 512 bytes / 512 bytes
 I/O size (minimum/optimal): 512 bytes / 512 bytes

Use fdisk utility to partition new disk

fdisk /dev/vdc
 n --> New Partition
 p --> Primary 
 Enter --> Default Partition Number
 Enter --> Default First Sector
 Enter --> Default Last Sector
 w --> Save Partition Table

Create a physical volume using newly created partition

[root@10431 ~]# pvcreate /dev/vdc1
 Physical volume "/dev/vdc1" successfully created.

First check the volume groups name

[root@10431 ~]# vgs
 VG #PV #LV #SN Attr VSize VFree
 cl 2 2 0 wz--n- 68.99g 1020.00m

He here cl is Volume Group’s Name

Extend Volume Group

[root@10431 ~]# vgextend cl /dev/vdc1
 Volume group "cl" successfully extended

Get Logical Volume Name

[root@10431 ~]# df -h
Filesystem Size Used Avail Use% Mounted on
/dev/mapper/cl-root 66G 11G 56G 17%
devtmpfs 7.8G 0 7.8G 0% /dev
tmpfs 7.8G 0 7.8G 0% /dev/shm
tmpfs 7.8G 8.4M 7.8G 1% /run
tmpfs 7.8G 0 7.8G 0% /sys/fs/cgroup
/dev/vda1 1014M 231M 784M 23% /boot
tmpfs 1.6G 0 1.6G 0% /run/user/0

/dev/mapper/cl-root

Extend the logical volume

[root@10431 ~]# lvextend -l +100%FREE /dev/mapper/cl-root
 Size of logical volume cl/root changed from <66.00 GiB (16895 extents) to <71.99 GiB (18429 extents).
 Logical volume cl/root successfully resized.

Finally Resized
In Centos 7 default filesystem is xfs.
xfs file system supports only extend not reduce. So if you want to resize the filesystem use xfs_growfs rather than resize2fs.

[root@10431 ~]# xfs_growfs /dev/mapper/cl-root
meta-data=/dev/mapper/cl-root isize=512 agcount=16, agsize=1113856 blks
 = sectsz=512 attr=2, projid32bit=1
 = crc=1 finobt=0 spinodes=0
data = bsize=4096 blocks=17300480, imaxpct=25
 = sunit=0 swidth=0 blks
naming =version 2 bsize=4096 ascii-ci=0 ftype=1
log =internal bsize=4096 blocks=2560, version=2
 = sectsz=512 sunit=0 blks, lazy-count=1
realtime =none extsz=4096 blocks=0, rtextents=0
data blocks changed from 17300480 to 18871296

Note: For ext4 filesystem use

resize2fs /dev/mapper/cl-root

Check new size

[root@10431 ~]# df -h
Filesystem Size Used Avail Use% Mounted on
/dev/mapper/cl-root 72G 11G 62G 15%
devtmpfs 7.8G 0 7.8G 0% /dev
tmpfs 7.8G 0 7.8G 0% /dev/shm
tmpfs 7.8G 8.4M 7.8G 1% /run
tmpfs 7.8G 0 7.8G 0% /sys/fs/cgroup
/dev/vda1 1014M 231M 784M 23% /boot
tmpfs 1.6G 0 1.6G 0% /run/user/0

New size changed from 56G to 62G


Proxmox VE noVNC SSL Issue

kvm: -vnc unix:/var/run/qemu-server/105.vnc,x509,password: Failed to start VNC server: Unable to access credentials /etc/pve/local/pve-ssl.pem: No such file or directory
TASK ERROR: start failed: command ‘/usr/bin/kvm -id 105 -chardev……

Revert to default SSL configuration

rm -rf /etc/pve/pve-root-ca.pem
rm -rf /etc/pve/priv/pve-root-ca.key
rm -rf /etc/pve/nodes/pve01/pve-ssl.pem
rm -rf /etc/pve/nodes/pve01/pve-ssl.key
rm /etc/pve/pve-root-ca.pem /etc/pve/priv/pve-root-ca.key

pvecm updatecerts -f
systemctl restart pveproxy

Clean Ubuntu 14x or 16x for Proxmox VE Template

Bash shell script to clean up Ubuntu for Proxmox VE Template

#!/bin/bash
# Stop rsyslog to clean up logs
service rsyslog stop

# Cleanup all logs
cat /dev/null > /var/log/audit/audit.log
cat /dev/null > /var/log/wtmp
cat /dev/null > /var/log/lastlog

#cleanup persistent udev rules
rm /etc/udev/rules.d/70-persistent-net.rules

#cleanup /tmp directories
rm -rf /tmp/*
rm -rf /var/tmp/*

#cleanup current ssh keys
rm -f /etc/ssh/ssh_host_*
sed -i -e 's|exit 0||' /etc/rc.local
sed -i -e 's|.*test -f /etc/ssh/ssh_host_dsa_key.*||' /etc/rc.local
bash -c 'echo "test -f /etc/ssh/ssh_host_dsa_key || dpkg-reconfigure openssh-server" >> /etc/rc.local'
bash -c 'echo "exit 0" >> /etc/rc.local'

# Clear hostname
cat /dev/null > /etc/hostname

# Cleanup apt
apt-get clean

#cleanup shell history
history -w
history -c


Create Custom CentOS 6x or 7x KVM template for Proxmox VE

Create a KVM with custom HDD, RAM, CPU, etc. using CentOS 6 or 7 minimal
Disable selinux
Edit the /etc/selinux/config

vi /etc/selinux/config

Change SELINUX=enforcing to SELINUX=disabled

# This file controls the state of SELinux on the system.
# SELINUX= can take one of these three values:
# enforcing - SELinux security policy is enforced.
# permissive - SELinux prints warnings instead of enforcing.
# disabled - No SELinux policy is loaded.
SELINUX=enforcing
# SELINUXTYPE= can take one of these two values:
# targeted - Targeted processes are protected,
# mls - Multi Level Security protection.
SELINUXTYPE=targeted

Turn off Firewall
(CentOS 7x)

systemctl stop firewalld
systemctl disable firewalld
yum -y install net-tools

Turn off Firewall
(CentOS 6x)

service iptables save 
service iptables stop 
chkconfig iptables off

Create a bash shell script seal.sh

vi /usr/src/seal.sh

Paste following script in the seal.sh file

#!/bin/bash 
echo "Seal This Centos 6x and 7x Server"
yum clean all
> /etc/machie-id
rm -f /etc/ssh/ssh_host_rm -rf /root/.ssh/
rm -f /root/anaconda-ks.cfg
rm -f /root/.bash_history
unset HISTFILE
rm -f /var/log/boot.log
rm -f /var/log/cron
rm -f /var/log/dmesg
rm -f /var/log/grubby
rm -f /var/log/lastlog
rm -f /var/log/maillog
rm -f /var/log/messages
rm -f /var/log/secure
rm -f /var/log/spooler
rm -f /var/log/tallylog
rm -f /var/log/wpa_supplicant.log
rm -f /var/log/wtmp
rm -f /var/log/yum.log
rm -f /var/log/audit/audit.log
rm -f /var/log/tuned/tuned.logroot

Go to use /usr/src folder and make script executable

cd /usr/src
chmod +x seal.sh

Run seal.sh script

./seal.sh

Clear History

cat /dev/null > ~/.bash_history && history -c && exit

Generalize (seal) a Linux virtual machine using the sys-unconfig command before making it into a template. This prevents conflicts between virtual machines deployed from the template

sys-unconfig


Using Proxmox web interface Stop VM

Next right click on the VM and Convert to Template

Your Custom CentOS Template is ready.

How to create a Linux LXC Container in Proxmox VE

Open Proxmox web.

Select Server View then select your Node then click on Create CT

Step: 1 

Enter hostname and Password

Step: 2 

Select Template Storage and then Select OS from Dropdown List and click on Next

Step: 3

Enter Disk Size

Step: 4

Enter Number of CPU Cores

Step: 5

Enter RAM size in MB

Step: 6

Enter Network Details

Step: 7

Enter Name Servers Details

Step: 8

Click on Finish 

Wait for the task to complete.

You Proxmox Container is ready.

Unable to SSH to Proxmox Default LXC Ubuntu 14.X and 16.X VPS

By default it’s not possible to establish a direct SSH connection to a Proxmox’s default Ubuntu 14.x or 16.x LXC VPS.

In order to SSH into a Ubuntu 14.x and 16.x LXC VPS you need to use NoVNC Console to apply following commands:

Modify /etc/ssh/sshd_config

nano /etc/ssh/sshd_config

Change Config

PermitRootLogin without-password to PermitRootLogin yes

Restart SSH Service

service ssh restart

Unable to SSH to Proxmox Default LXC VPS Centos 7

By default it’s not possible to establish a direct SSH connection to a Proxmox’s LXC VPS.

In order to SSH into a LXC VPS you need to login to HostFav’s account and use NoVNC Console to apply following command:

Install SSH Server:

yum install openssh-server

Start SSH Service

systemctl start sshd.service

Enable Auto Start

systemctl enable sshd.service


Add a new physical hard drive to Proxmox VE 4x 5x

Tutorial using: Proxmox VE 5.0-23/af4267bf

Add new Physical Hard Drive to your Proxmox Node.

Log in to Promox web portal

Select correct Proxmox Node and click on Disks

You can see new Physical hard drive is showing /dev/sdb

Open Proxmox VE Node’s Shell

Use fdisk command to create partition

root@pve01:~# fdisk /dev/sdb

Welcome to fdisk (util-linux 2.29.2).
Changes will remain in memory only, until you decide to write them.
Be careful before using the write command.

Command (m for help):

Create new partition type n and hit enter

Command (m for help): n
Partition type
 p primary (0 primary, 0 extended, 4 free)
 e extended (container for logical partitions)

Select partition type p for Primary and select default value for Partition Number, First Sector and Last Sector.

Partition number (1-4, default 1):
First sector (2048-16777215, default 2048):
Last sector, +sectors or +size{K,M,G,T,P} (2048-16777215, default 16777215):

Created a new partition 1 of type 'Linux' and of size 8 GiB.

Save partition – type w and hit enter.

Command (m for help): w
The partition table has been altered.
Calling ioctl() to re-read partition table.
Syncing disks.

Now new drive is ready. Using following commands we are going to create LVM Volume.

Create Physical Volume

root@pve01:~# pvcreate /dev/sdb1
 Physical volume "/dev/sdb1" successfully created.

Create Volume Group

root@pve01:~# vgcreate newdrive /dev/sdb1
 Volume group "newdrive" successfully created

Now add LVM to Proxmox

Go to Datacenter –> Storage –> LVM

Give a new name for the storage, select correct volume group from drop down and click on Add.

New drive has been added to Proxmox Successfully.

VM is Locked (backup) (500)

Proxmox. ERROR: VM is locked (backup) (500)

Sometime when automated OR Manual Proxmox backup process gets stuck, it impossible to many any changes to VM. You will get following error “VM is locked (backup) (500)”

To unlock KVM VM

qm unlock <VM ID>

To unlock LXC VM

pct unlock <VM ID>