Backup all MySQL databases in separate files

If you want to back up all of your databases, you can accomplish this with the —all-databases

mysqldump -u root -p --all-databases > All-Database.sql

Use following bash Script to backup All Databases in separate files.

#! /bin/bash
 
DATETIME=$(date +"%F")
BACUP_PATH="/backup/$DATETIME"
USER="backup"
MYSQL=/usr/bin/mysql
PASSWORD="password"
MYSQLDUMP=/usr/bin/mysqldump
 
mkdir -p "$BACUP_PATH/mysql"
 
databases=`$MYSQL --user=$USER -p$PASSWORD -e "SHOW DATABASES;" | grep -Ev "(Database|information_schema|performance_schema)"`
 
for db in $databases; do
 $MYSQLDUMP --force --opt --user=$USER -p$PASSWORD --databases $db | gzip > "$BACUP_PATH/mysql/$db.gz"
done

Your bash script contain MySQL username and password. You should not use a root account. Create a new user only for backups with backup privileges:

Script to Create a SFTP User to Access Only Home Directory – Ubuntu 12x, 14x or 16x

Following script will create a SFTP user to access only home directory (Ubuntu 12x, 14x or 16x)

This script will save password in account.txt file.

Go to your home directory

cd /home

Create a account.txt file

sudo touch account.txt

Create a shell script and paste following script

nano createsftp.sh
#!/bin/bash

####
# This script automatically creates SFTP Account and allow only access to Home Directory
#
# Author: Asuk Nath
# Date: 11/20/15
#
###

# Check user name supplied or not
if [ $# -lt 1 ]; then
echo "Please supply a username"
echo "Example: " $0 "john"
exit
fi

# Check if username already exist
if id "$1" >/dev/null 2>&1; then
 echo "Username Exists"
 echo "Use different username"
 exit
fi

# Declare local variable and generate random password for SFTP
newuser=$1
randompw=$(cat /dev/urandom | tr -dc 'a-zA-Z0-9' | fold -w 8 | head -n 1)

# Create new user and assign random password.
useradd $newuser
echo $newuser:$randompw | chpasswd

# Setting folder permission
echo "Please wait Applying Permission and setting Incoming folder"

mkdir /home/$newuser
chown root:root /home/$newuser
sleep 2
mkdir /home/$newuser/sftproot
sleep 2
chown $newuser:$newuser /home/$newuser/sftproot

cat <<EOF >> /etc/ssh/sshd_config
Match User $newuser
ChrootDirectory /home/$newuser/
 ForceCommand internal-sftp
 AllowTCPForwarding no
 X11Forwarding no
EOF

sleep 2
service ssh restart

# New Username and Password to account.txt

cat <<EOF >> /home/account.txt
$newuser $randompw
EOF

echo "SFTP Account:" $newuser "has been created with the password:" $randompw

Make this script executable

sudo chmod +x createsftp.sh

Command to create SFTP account

root@sftp:/home# sudo ./createsftp.sh user1
Please wait Applying Permission and setting Incoming folder
SFTP Account: user1 has been created with the password: Jtkxp0ZE

Password is also saved in account.txt file

cat account.txt
user1 6C215q3l

Delete SFTP account

root@sftp:/home# sudo deluser user1
Removing user `user1' ...
Warning: group `user1' has no more members.
Done.

Also you need to delete following lines from sshd_config file

Edit /etc/ssh/sshd_config

sudo nano /etc/ssh/sshd_config

Delete following lines

Match User user1
ChrootDirectory /home/user1/
 ForceCommand internal-sftp
 AllowTCPForwarding no
 X11Forwarding no

Delete user’s home directory

sudo rm -rf user1

Clean Ubuntu 14x or 16x for Proxmox VE Template

Bash shell script to clean up Ubuntu for Proxmox VE Template

#!/bin/bash
# Stop rsyslog to clean up logs
service rsyslog stop

# Cleanup all logs
cat /dev/null > /var/log/audit/audit.log
cat /dev/null > /var/log/wtmp
cat /dev/null > /var/log/lastlog

#cleanup persistent udev rules
rm /etc/udev/rules.d/70-persistent-net.rules

#cleanup /tmp directories
rm -rf /tmp/*
rm -rf /var/tmp/*

#cleanup current ssh keys
rm -f /etc/ssh/ssh_host_*
sed -i -e 's|exit 0||' /etc/rc.local
sed -i -e 's|.*test -f /etc/ssh/ssh_host_dsa_key.*||' /etc/rc.local
bash -c 'echo "test -f /etc/ssh/ssh_host_dsa_key || dpkg-reconfigure openssh-server" >> /etc/rc.local'
bash -c 'echo "exit 0" >> /etc/rc.local'

# Clear hostname
cat /dev/null > /etc/hostname

# Cleanup apt
apt-get clean

#cleanup shell history
history -w
history -c


Configure IP Address Manually on Ubuntu 12x 14x 16x

To configure IP Address Manually (Static) you need to open edit /etc/network/interfaces

nano /etc/network/interfaces

You will find default configuration

# This file describes the network interfaces available on your system
# and how to activate them. For more information, see interfaces(5).

# The loopback network interface

auto lo
iface lo inet loopback

auto eth0
iface eth0 inet dhcp

From above configure file we know that our interface name is eth0 and configured as dhcp

Below is an example of a static IP configuration on a system with only one Ethernet interface (eth0) and 192.168.1.10/24 for the IP address.

# This file describes the network interfaces available on your system
# and how to activate them. For more information, see interfaces(5).

# The loopback network interface
auto lo
iface lo inet loopback

# The primary network interface
auto eth0
iface eth0 inet static
    address 192.168.1.10
    netmask 255.255.255.0
    gateway 192.168.1.1
    dns-nameservers 8.8.8.8 8.8.4.4

Add Let’s Encrypt SSL Certificate to Nagios 4.x running on CentOS 7

The easiest way to install Let’s Encrypt client by cloning github repository. To install git on your system you must enable Epel repositories with the following command

yum -y install epel-release

Install git client

yum -y install git

Change directory and go to /usr/src

cd /usr/src/

Clone Let’s Encrypt Client from Github

git clone https://github.com/letsencrypt/letsencrypt 
cd /usr/src/letsencrypt

Run letsencrypt-auto script with your domain name

./letsencrypt-auto --apache -d FullyQualifiedDomainName

This Script will download and install all necessary packages.

Answer following questions.

- Enter email address ( Used for urgent renewal and security notices)
- Please read the Terms of Service and Accept it
- Would you be willing to share your email.....
- Select ssl.conf

IMPORTANT NOTES: – Congratulations! Your certificate and chain have been saved at:   /etc/letsencrypt/live/ YourFullDomainName/fullchain.pem   Your key file has been saved at:   /etc/letsencrypt/live/YourFullDomainName /privkey.pem   Your cert will expire on 2017-11-12. To obtain a new or tweaked   version of this certificate in the future, simply run   letsencrypt-auto again with the “certonly” option. To   non-interactively renew *all* of your certificates, run   “letsencrypt-auto renew” – Your account credentials have been saved in your Certbot   configuration directory at /etc/letsencrypt. You should make a   secure backup of this folder now. This configuration directory will   also contain certificates and private keys obtained by Certbot so   making regular backups of this folder is ideal.

Certificate has been installed successfully.

Let’s Encrypt certificate is only valid for 90 days. To renew automatically add following line to your corn job.

0 1 12 * * /usr/src/letsencrypt/certbot-auto renew

How to find out information about a LXC VPS CPU

Find CPU information

cat /proc/cpuinfo

or

[root@server ~]# lscpu
Architecture: x86_64
CPU op-mode(s): 32-bit, 64-bit
Byte Order: Little Endian
CPU(s): 24
On-line CPU(s) list: 0-23
Thread(s) per core: 2
Core(s) per socket: 6
Socket(s): 2
NUMA node(s): 2
Vendor ID: GenuineIntel
CPU family: 6
Model: 44
Model name: Intel(R) Xeon(R) CPU L5640 @ 2.27GHz
Stepping: 2
CPU MHz: 2266.000
BogoMIPS: 4533.49
Virtualization: VT-x
L1d cache: 32K
L1i cache: 32K
L2 cache: 256K
L3 cache: 12288K
NUMA node0 CPU(s): 0,2,4,6,8,10,12,14,16,18,20,22
NUMA node1 CPU(s): 1,3,5,7,9,11,13,15,17,19,21,23

Find out number of Virtual CPU Cores

cat /proc/cpuinfo | grep processor | wc -l

Create Custom CentOS 6x or 7x KVM template for Proxmox VE

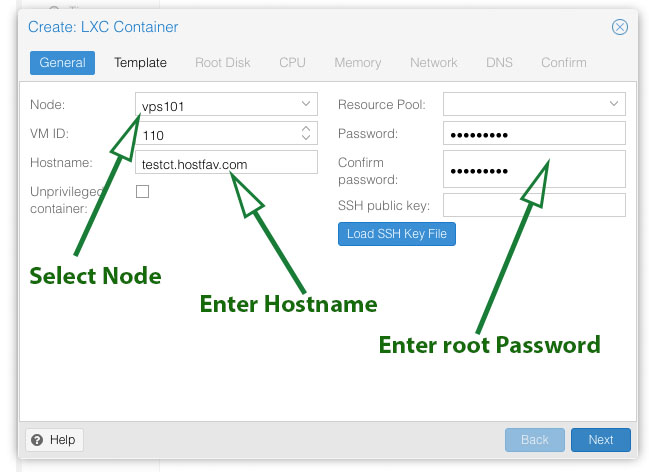
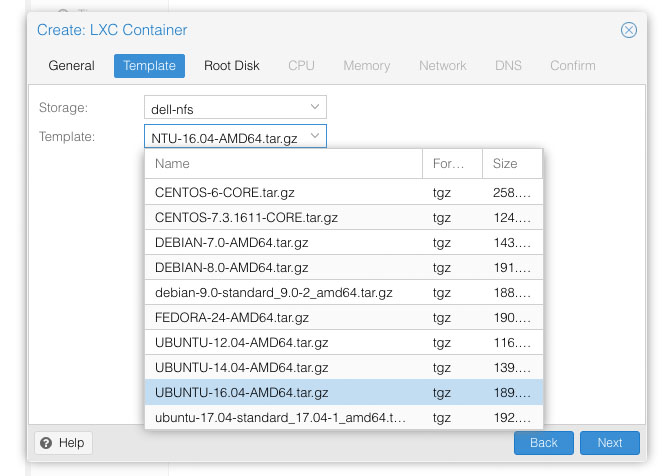
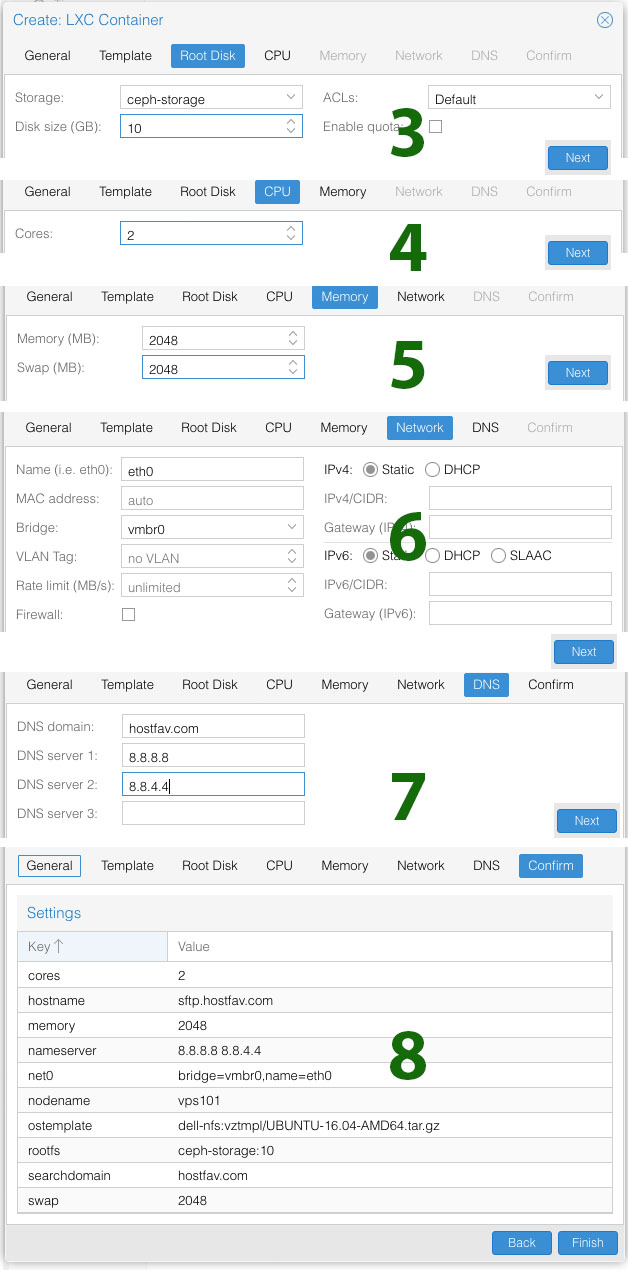
Create a KVM with custom HDD, RAM, CPU, etc. using CentOS 6 or 7 minimal
Disable selinux
Edit the /etc/selinux/config

vi /etc/selinux/config

Change SELINUX=enforcing to SELINUX=disabled

# This file controls the state of SELinux on the system.
# SELINUX= can take one of these three values:
# enforcing - SELinux security policy is enforced.
# permissive - SELinux prints warnings instead of enforcing.
# disabled - No SELinux policy is loaded.
SELINUX=enforcing
# SELINUXTYPE= can take one of these two values:
# targeted - Targeted processes are protected,
# mls - Multi Level Security protection.
SELINUXTYPE=targeted

Turn off Firewall
(CentOS 7x)

systemctl stop firewalld
systemctl disable firewalld
yum -y install net-tools

Turn off Firewall
(CentOS 6x)

service iptables save 
service iptables stop 
chkconfig iptables off

Create a bash shell script seal.sh

vi /usr/src/seal.sh

Paste following script in the seal.sh file

#!/bin/bash 
echo "Seal This Centos 6x and 7x Server"
yum clean all
> /etc/machie-id
rm -f /etc/ssh/ssh_host_rm -rf /root/.ssh/
rm -f /root/anaconda-ks.cfg
rm -f /root/.bash_history
unset HISTFILE
rm -f /var/log/boot.log
rm -f /var/log/cron
rm -f /var/log/dmesg
rm -f /var/log/grubby
rm -f /var/log/lastlog
rm -f /var/log/maillog
rm -f /var/log/messages
rm -f /var/log/secure
rm -f /var/log/spooler
rm -f /var/log/tallylog
rm -f /var/log/wpa_supplicant.log
rm -f /var/log/wtmp
rm -f /var/log/yum.log
rm -f /var/log/audit/audit.log
rm -f /var/log/tuned/tuned.logroot

Go to use /usr/src folder and make script executable

cd /usr/src
chmod +x seal.sh

Run seal.sh script

./seal.sh

Clear History

cat /dev/null > ~/.bash_history && history -c && exit

Generalize (seal) a Linux virtual machine using the sys-unconfig command before making it into a template. This prevents conflicts between virtual machines deployed from the template

sys-unconfig


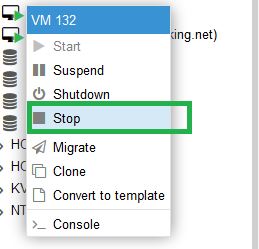
Using Proxmox web interface Stop VM

Next right click on the VM and Convert to Template

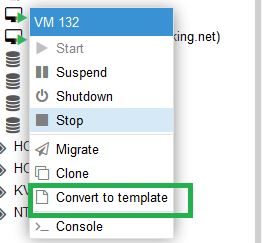
Your Custom CentOS Template is ready.

How to create a Linux LXC Container in Proxmox VE

Open Proxmox web.

Select Server View then select your Node then click on Create CT

Step: 1 

Enter hostname and Password

Step: 2 

Select Template Storage and then Select OS from Dropdown List and click on Next

Step: 3

Enter Disk Size

Step: 4

Enter Number of CPU Cores

Step: 5

Enter RAM size in MB

Step: 6

Enter Network Details

Step: 7

Enter Name Servers Details

Step: 8

Click on Finish 

Wait for the task to complete.

You Proxmox Container is ready.

Direct query from a specific DNS server

You can use following command both Windows and Linux

nslookup IP_Address/Domain_name DNS_server

nslookup lg.ca.hostfav.com 8.8.8.8
Server: google-public-dns-a.google.com
Address: 8.8.8.8

Non-authoritative answer:
Name: lg.ca.hostfav.com
Address: 104.225.209.xx